Inbox
Description
Depending on the authorization all submitted form records will be displayed clearly in either the default view or project view. In the inbox it is also possible to change the state of form records, upload files, write comments and export form record data.
Structure

As a whole the inbox consists of three separate parts: the filte menu at the left side, the form record list and the review area. When the inbox is being opened only the filter menu and the form record list are visible. A click on a form record within the form record list opens the review area of that form record.
Filter menu
The filter menu is used for configuring how the form records are being displayed within the form record list. The following filters are provided:
Search
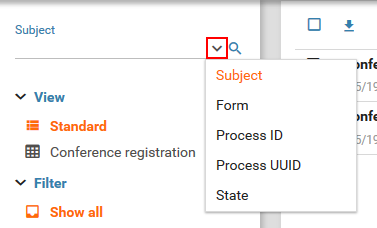
At the top of the filter menu there is an input field for searching forms. The arrow button to the right of the is being used to select the search type (see figure). The following search types are provided:
- Subject
Search for form records with the given subject. - Form
Search for form records with the given form title. - Form record ID
Search for form records with the given ID. - Process ID
Search for form records with the given process ID. - State
Search for form records that are in the given state.
No search filter is being applied if the input field is empty. In project views the input field is not being displayed.
View
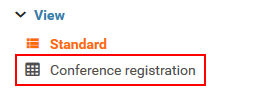
The view selection is only available if project views have been configured (for configuring project views see My Forms > Inbox). Which form records are being displayed in the form record list and how they are being displayed depends on the selected view. There are two different types of views:
- Default
The default view can not be configured. Depending on the users authorization all submitted form records are displayed in the form record list. - Project views
Project views have the names of the forms they are matched to. These views only contain form records of the appropriate form. The form records will be displayed in a data table. The number of columns depends on the view configuration (see form record list).
Filter
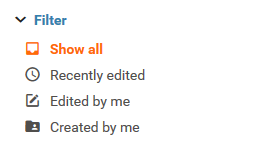
There are four quick filters available for configuring the form record list.
- Show all
All form records of the current view will be displayed. - Recently edited
All form records that have been edited in the past 14 days will be displayed. - Edited by me
All form records that have been edited by the current user will be displayed. - Created by me
All form records that have been created by the current user will be displayed.
Schedules 6.5.0+
This filter menu is only available in the calendar view. Schedules that have booked appointments can be (un-)selected here. In the calendar-view only appointments of the selected schedules will appear.
Inboxes
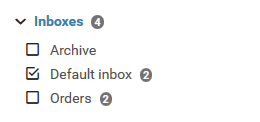
Every form record is stored in an inbox. By default this is the Default inbox. What inbox a form record should be stored in can be configured in the inbox settings of the form. By selecting inboxes only the form records within the selected inboxes will be displayed. Next to each inbox a number is diplayed showing the count of unread form records within that inbox. Is no number present than there are no unread form records. Is no inbox selected or the inbox filter is not available (because all form records are stored in the same inbox) than the form records of all inboxes will be displayed.
The inbox filter depends on the selected view. The inbox filter is available if the form records of the form record list are stored in more than one inbox. If this is not the case than the inbox filter is not available.
Submit date

The form record list can be filtered by the submit date of the form records. For this there are two input fields available:
- from
All form records submitted from the given date will be displayed. - until
All form records submitted until the given date will be displayed.
No submit date filter will be applied if these fileds are empty.
Sorting
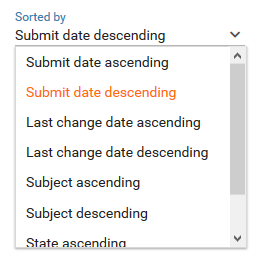
The default view of the form record list can be sorted by different criteria. If a project view is selected this field is not available. Sorting of project views is done by clicking on the column headers. The following criteria (in ascending and descending direction) are available for sorting:
- Submit date
- Last change date
- Subject
- State
More filters
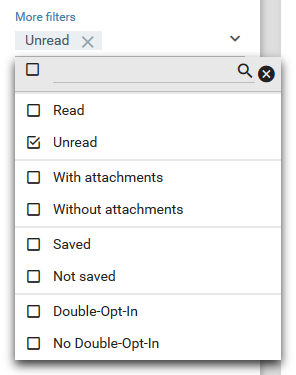
More filters are provided for further refinement of the search:
- (Un-)Read
Only (un-)read form records will be displayed. - With/Without attachment
Only form records with/without attachments will be displayed. - (Not) Saved
Only form records that are (not) saved will be displayed. - (No) Double-Opt-In
Only form records that are in the state Waiting for Opt-In will be displayed (see Double-Opt-In for configuration).
Form record list
All form records are displayed in the form record list depending on the set filters. There are two different views of the form record list: the default view and the project view. The view can be changed in the filter menu.
Clicking on a form record in the form record list opens it in the review area. If the review area is not visible, it will be opened by clicking on a form record. After opening a form record it will be marked as read and the font weight will be set from bold to normal. When filtering unread form records this record will be excluded. For marking a form record unread click the appropriate button in the header of the form record list.
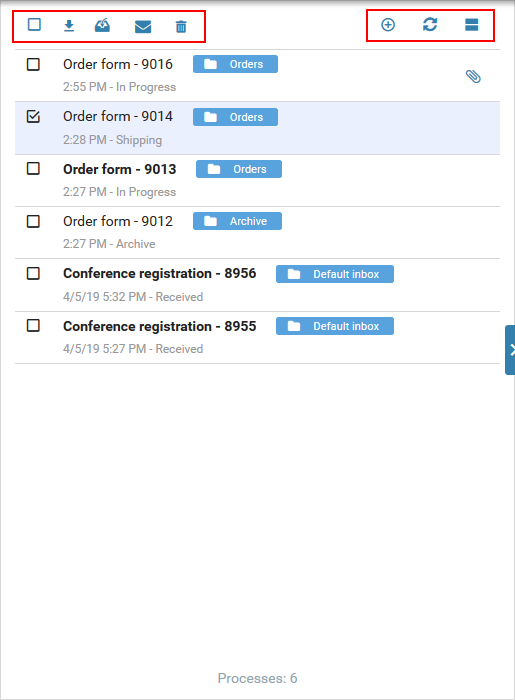
The form record list header consists of two button rows (see figure). On the left are form record actions and on the right are general actions.
Form record actions
Which form record actions will be displayed depends on the currently selected form records.
Select all form records
Selects all form records based on the currently set filters. This checkbox is always available.
Export
Exports all selected form records or all form records based on the currently set filters if there are no form records selected.
For further information on form record export see Export.
Move
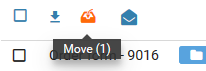
Clicking the move button (see figure) opens a dialog in which the desired inbox must be chosen. All selected form records will be moved to that inbox after confirming. Moving form records does not trigger any action of the workflow.
/ (Un-)Read
Clicking the Read or Unread button markes the selected form records as read or unread.
Delete
Clicking this button deletes the selected form records. This function is only available if all selected form records are deletable. A form record is deletable if the state, it is currently in, allows for it to be deleted. In the state configuration or access configuration the option Form records can be deleted or Form records deletable needs to be activated in order for the form record to be deletable. If this is not the case the form record can not be deleted.
General action
On the right side of the form record list header there are a number of general actions which are always available:
New form record
Opens up a menu through which existing forms may be called for submitting new form records.
Refresh
Refreshs the view.
/ Position of the review area
Toggles the position of the review area. The review area can be positioned at the right side or bottom of the window.
Default view

In contrast to the project views and depending on the set filters, all form records are being displayed in the default view. Form records with attachments are marked by a paperclip icon (see figure). Clicking the icon opens the attachment page of the form record directly. Every record entry consists of the subject, submit date, state as well as the inbox (in blue, see figure). Clicking the inbox sets an inbox filter.
Calendar view 6.5.0+
The calendar view is available if schedules with booked appointments exist. In this view all booked appointments are displayed. Which schedules should be displayed can be set from the filter menu.
Project view

Project views are data table views which are available as soon as display columns have been configured for the form (see Form > Inbox). The values of the configured form elements as well as additional form information will be displayed in the data table. Every column can be filtered and sorted. Form records containing attachments are marked by a paperclip icon (see figure). Clicking the icon opens the attachment page of the form record directly.
Export
Clicking Export in the header of the form record list exports all selected form records or all form records based on the currently set filters if there are no form records selected (see form record actions).
Example:
No form records are selected and filter is set to the inbox "Default inbox". Performing an export action will export all form records that are stored in the inbox "Default inbox". For exporting the form records of all inboxes the filter on "Default inbox" needs to be removed.
There are three different types of exporting form records:
XML
Form record data of all form elements will be exported flat in an XML structure.
<processes>
<process process-uid="xxx" creation-date="yyyy-mm-dd HH:mm:ss.ms TZ" project-name="yyy" status="zzz">
<form version="1">
<field name="elName">
<plainValue><![CDATA[Wert]]></plainValue>
<values count="1">
<value index="0"><![CDATA[]]></value>
</values>
<label><![CDATA[]]></label>
</field>
...
</form>
<process ...>
</processes>
</xfc-data>
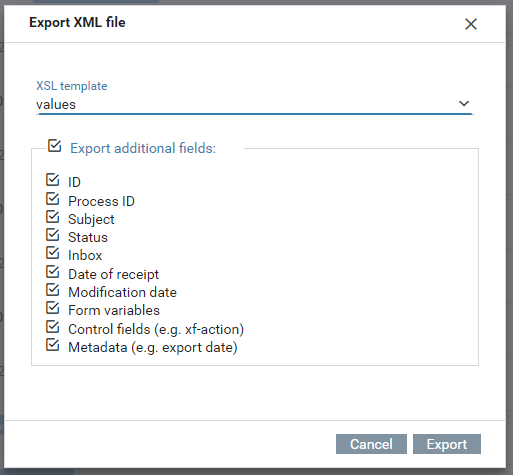
Using an optional XSL template (see figure) the exported XML can be transformed into the desired format. The appropriate template can be selected using the combobox. For further information on XSL templates look here.
Excel
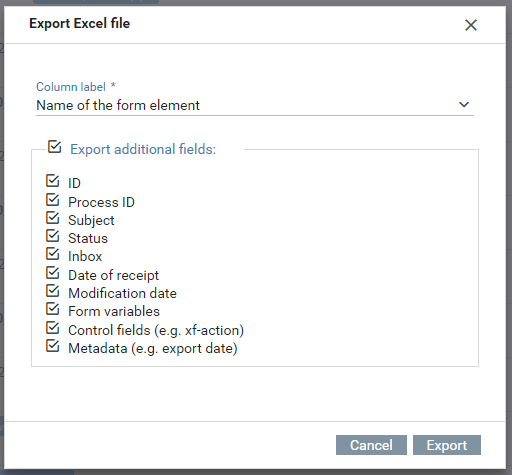
All data will be exported to an Excel file. If form records of multiple forms have been selected than a new worksheet will be created for every form within the Excel file. All values of repeated form elements will be put into the same cell, separated by commas. If this is not desired the export option Excel (multiline) is recommended.
The column names of the resulting Excel file may configured using the following options:
- Name of the form element
The element names that are used in the Xima® Formcycle Designer will be used for the Excel columns (e.g.: tf1, sel1, ...). - Alias of the form element
The element alias that is used in the Xima® Formcycle Designer will be used for the Excel columns. - Column name of the data table
The column names that have been set in the inbox configuration will be used for the Excel columns. This selection is only available in the project views.
Excel (multiline)
The export works the exact same way as the simple Excel export, except that the values of repeated form elements will be put into separate rows.
Export meta data (Optional)
Meta data may be exported additionally for every export type (see figure XML export/Excel export). The following fileds are available for export:
- ID 6.4.0+
System ID of the form record. - Process ID
Process ID of the form record. - Subject 6.4.0+
Subject of the form record. - Status
Name of the state the form record is in at the time of export. - Inbox 6.4.0+
- Inbox in which the form record is located.
- Date of receipt
Date the form record was submitted/created. - Modification date
Date of last change to the form record. - Form variables
Configured Form variables an their values. - Control fields
Control fields of the form such as xf-action, which holds the name of the button used for submitting the form. - Meta data
Date of export and used FORMCYCLE version.
Review area
Form records selected by a mouse click will be displayed in the review area of the inbox. Submitted form data can be reviewed here. Additionally a number of form record actions ma be performed. The review area consists of a header and content part (see figure).

The header is used for navigating the selected form record and performing form record actions. It consists of a title row, a navigation row and an action row. Depending on the selection in the navigation row different aspects of the form record will be displayed in the content area. Also the available form record actions in the action row change depending on the selection in the navigation row.
Title row
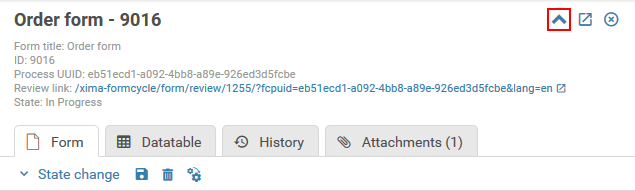
The title row provides meta information about the form record. To the left is the form record subject in bold. To the right there are three buttons:
- Details
Expands the title row to reveal further meta information about the form record (see figure). - Open in new tab
Opens the current form record in a new tab. - Close
Closes the review area.
Navigation row
The navigation row provides a number of tabs for displaying different aspects of the form record. Depending on the selected navigation tab the available actions in the action row change as well as the displayed information in the content area.
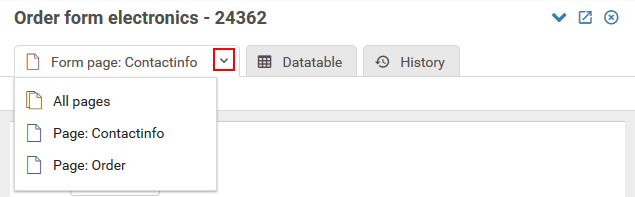
- Form page
Clicking this tab shows the filled out form. If the selected form consists of multiple pages the user can access in the current state, than an expand icon appears on the right side of this tab. Different form pages can be accessed by clicking the icon. It is also possible to show all pages at once (see figure).
This tab provides the following form record actions: - Datatable
The submitted form record data will be displayed in a data table. - History
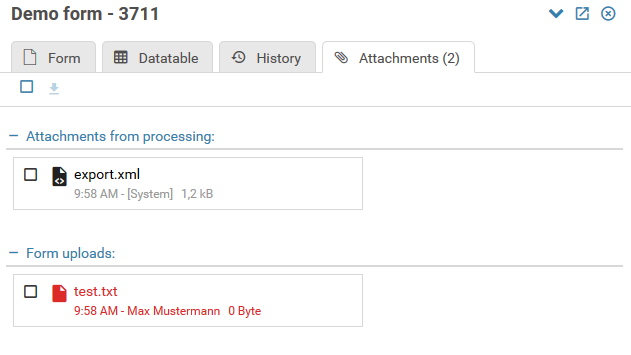
Shows the protocol entries (history) of the current form record. State changes, executed actions, attached files, etc. will be logged and displayed here. This tab provides the following form record actions: - Attachments
If the form record contains attachments this tab will be displayed and allows access to the form record attachments. The attachment area of a form record is divided into form upload attachments and workflow attachments. Form uploads are attached via upload elements of a form. Workflow attachments will be generated through workflow processing actions. Attachments with a size of 0 Byte will be marked red.- (De-)Selectionof all attachments
- Download
- Delete attachments
Action row
- State change
Saves changes in the form data, changes the state of the form record and executes the actions of the selected state. This action is only available if the state can be changed by the user. The state can only be changed if:- the current state of the selected form record has a follow-up state.
- the user is allowed to change the state (can be configured in the workflow).
- Save
Saves changes to the form data. - Delete
Deletes the form record and closes the review area. Form records can only be deleted if the are in a state the allows for it (see access configuration). - Advanced options
Opens up a dialog which allows for advanced form record changes:- Correct form data: Saves all changes to the form data with the option of (not) validating the form.
- Rerun actions of the current state: Reruns the actions of the current state. Whether or not form data changes should be saved and validated can be configured.
- Change state: Similar to the normal state change. Whether or not the actions of the destination state should be executed and whether or not form data changes should be saved and validated can be configured. This action is only available if the state can be changed by the user.
- Add entry
Opens up a dialog for adding protocol entries to the form record history. It is also possible to select additional files which will be attached to the form record. - Download attachments
Downloads the selected attachments. - Delete attachments
Deletes the selected attachments.